How to configure JWT in webMethods Integration Server
Solution:
Following is the high level sequence of steps to configure/implement JWT in webMethods IS
Login to IS AdminUI
Go to “Trusted Issuers” section under Security\JWT
Click on “Add Issuer” link to create new Trusted Issuer in IS. You need to specify Name & Description during Trusted Issuer creation.
Now go to “Issuer Configuration” section under Secruity\JWT
Click on “Add Issuer Certificate Mapping” link and associate appropriate certificate with newly created Issuer:
Optionally add/update issuer skew mapping in IS
In order to generate actual JWT, you can execute built-in flow service “pub.jwt.generateSignedJWT” with params as shown:
Note:
keyStoreAlias value should be the name of valid keyStore in IS
keyAlias value will be the privateKey alias in keyStore
Issuer value will be the name of some Trusted Issuer configured in IS
Subject value will be the some valid user (in IS) that has rights to execute the service for which JWT token is being generated
Finally, it is possible to add custom claims JWT by adding key/value pairs to the list param “customClaims“
After completing above steps, you should be able to invoke desired service (E.g. some flow service exposed as REST resource in IS) by using generated JWT as a “Bearer Token” in REST client (such as Postman)
How to configure OAuth in webMethods integration server
Solution:
You can configure OAuth in webMethods (v 10.11) as following:
Login to IS AdminUI and go to Security –> OAuth
Step 1: (OAuth client specific configurations)
Create new OAuth client by clicking “Client Registration” hyperlink under OAuth section and then click “Register Client” hyperlink. Sample client configuration are shown below:
Note:
Redirect uri specifies the uri/url to which client request should be redirected to (after client OAuth token request has been approved). It can be any appropriate uri including some flow service invocation url e.g. http://localhost:5555/invoke/MyApp/MyFlowService01
Please refer to webMethods documentation for details about “Type”, “Allowed Grants”, Expiration Interval” and “Refresh Count” attributes/fields in above screenshot. Make sure newly created client is Active in IS admin UI
Step 2: (Define Scope)
Click on “Scope Management” hyperlink under OAuth section in IS AdminUI To create new scope, click on “Add Scope” hyperlink. Sample configurations are shown below:
Note: Folder and Services section will contain name of the folder or services in your package, that will become part of this scope and access to those folder or access to invoke those services will be allowed by IS when client will send request using OAuth token
Step 3: (Associate scope to client)
To associate scop with client click on “Associates scope to clients” hyperlink under Scope Management section of IS AdminUI as shown:
At this stage, after completion of above mentioned three steps, our initial configuration for OAuth client setup is complete and we are now ready to test our OAuth client setup in IS
Testing OAuth client setup in IS
Following are the steps
Login to IS AdminUI and go to Security -> OAuth section and click on newly created OAuth client and copy the Client ID associated with it as shown:
Next, open web browser and invoke webMethods built-in “pub.oauth:authorize” service with following parameters:
Where param response_type will be set to value “code” in url and client_id param value will be set to actual ID of the client (that was copied form IS AdminUI in above step)
Upon successful invocation of pub.oauth.authrize service via web browser, you should see following response/output in webBrowser:
Now, click on “approve” button and browser will be redirected to the uri that was specified in OAuth client settings/configurations. (Note: redirect uri specified in OAuth client configuration section can be the invocation url of a flow service as well i.e. if you want to invoke some specific flow service after OAuth client approval then you may specify the invocation url for corresponding flow service)
For demo purpose, we would create and use a simple flow service to capture the OAuth access token that will be generated by IS (after OAuth client request has been approved).
Our demo flow service (to capture OAuth access token) will invoke pub.client.http service internally with following pipeline mapping/configurations:
grant_type, code & redirect_uri pipeline input prams will be mapped to corresponding prams under data\args
auth\user = Client ID pulled from OAuth client configurations in IS
auth\password = Secret pulled from OAuth client configurations in IS
This flow service, upon successful invocation, will capture and return/show OAuth access token & refresh token
Now, by using generated OAuth access token, you should be able to authorize client and invoke resources/services inside the scope (that was associated with OAuth client in IS AdminUI) till access token expiry
*Where SomeFileName.cer will be replaced by actual certificate file name in above command *Where SomeJKSFileName.jks will be replaced by actual truststore file name *Where SomeAliasName will be replaced by actual Alias name (for newly added trusted certificate)
3. You will be prompted to enter password for truststore (new password or existing password depending upon whether truststore is new or existing one). Upon successful execution, the keytool command will either create new .jks file or update existing .jks file (by adding new certificate to existing truststore)
If jks file is newly created one (new truststore created) then you need to load newly created truststore in webMethods AdminUI.
You can do it by clicking on Security menuitem in AdminUI, then click on Keystores, then click on Create truststore alias hyperlink and following screen will pop up:
Location specified in above screenshot will be the location of actual .jks file and password will be the password of new/existing truststore
Click “Save Changes” button and restart webMethods Integration Server for changes to take effect
After restart of IS, you should be able to successfully connect desired https url by specifying correct truststore (which contains corresponding certificate) inside webMethods services.
How to setup new keystore in webMethods integration server
Solution:
Prerequisite of setting up keystore in webMethods is to have a PKCS12 format file. PKCS12 file (keystore) contains private key, public key and associated chain of certificates. You can generate your own PKCS12 file (in case of self-signed certificates) or you can get it via certificate authority.
Once you have PKCS12 file with you, you can setup keystore in webMethods as following:
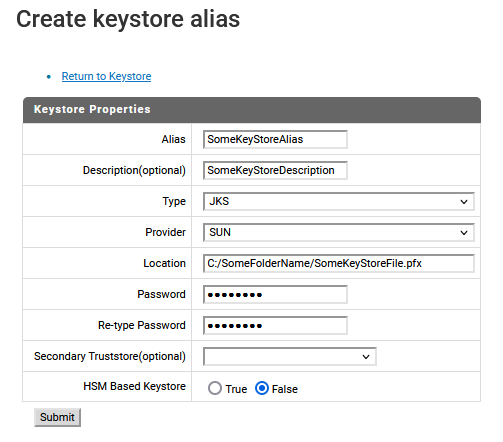
Login to webMethods AdminUI and click on Security Menuitem then click on KeyStore and finally click on Create keystore alias link:
Next, click “Submit” button and on next screen, verify keystore details and re-enter password for keystore and click “Save Changes” button.
If everything is done correctly, then you should see a successful keystore created confirmation message on AdminUI.
If required, restart IS after configuring new keystore
Note:
Location/path specified in above screenshot refers to the location of PKCS12 format file (e.g. .pfx extension file).
Password in above screenshot will be the password of the PKCS12 format file.
Problem: How to enable file-size based rolling/archiving of log files in Log4j2.
Solution: This problem can be solved by using RollingFileAppenders in Log4j2 based logging. Rolling file appenders enable Log4j2 to roll current log file (by renaming it) when certain specific condition or criteria is met for example when current log file size exceeds certain threshold or after specific time duration.
When current log file is rolled, then logging will resume in new log file. You can conveniently specify different paths or filename patterns for current log file as well as rolling file in the configuration of RollingFileAppender.
For example, following RollingFileAppender configuration will automatically roll log file whenever size exceeds 5 KB:
In above xml based configuration file: • We have added a RollingFileAppender (one of the many appenders offered by Log4j2)
• Value of the fileName attribute defines the path and log filename pattern. For example above configuration will generate log file named as “PaymentAppLog-20221109.log” (where current date will always appear in log file name)
• Value of the filePattern attribute defines the path and rolling filename pattern. For example above configuration will generate rolling file named as ”PaymentAppArchive20221109_1.log” (where current date will always appear in rolling file name and _1 refers to rolling file counter which will increment by one automatically for each new rolling file)
• %i in filePattern value means add counter to rolling file name • %d{yyyyMMdd} in filePattern value means add current date to rolling file name • ${date:yyyyMMdd} in filename value means add current date to log file name • %d %-5p- %m%n defines the log file content pattern/layout
Scenario Details: Nothing happens when you click on “Help -> Install New Software” menu item in webMethods service designer
Solution: Try following as one of the solutions:
1) Close all open instances of service designer (eclipse) 2) Run service designer again as administrator (i.e. right click and choose run as administrator option)
How to check Universal Messaging log for license expiry related error messages in webMethods
Solution:
Go to path “[Software AG Installation Dir]/UniversalMessaging/server/[UM instance name]/data” on the server or virtual machine where UM component is installed (note: here [Software AG Installation Dir] & [UM instance name] will be replaced with actual folder names) and then open file “nirvana.log” and go through file content to see license related error details (if any) or you can search specific keywords in log file as per requirement
How to add custom jar files to project build path in webMethods service designer
Solution:
You can add custom jar files to build path of a package in webMethods service designer as following:
1) Open webMethods service designer 2) Open ‘Package Explorer’ view by clicking on “Windows -> Show View -> Package Explorer”
3) Select desired package (project) in Package Explorer windows and right click it and select ‘Properties’ 4) On Properties windows, click on Java Build Path 5) On Java Build Path windows, click on “Libraries” tab
6) Click on “Add JARs..” button to add custom jar files placed in current package or click on “Add External JARs..” button to add custom jar files from location outside the current package
Problem: Specified path is not on the [allowedWritePaths] allowed list in the fileAccessControl
Scenario Details: In webMethods, When you try to write string to some file using built-in service “stringToFile” (under WmPublic package), the service may return error “Specified path [actual file path] is not on the [allowedWritePaths] allowed list in the fileAccessControl”
Sample input params for stringToFile service could be as shown below:
Resolution: 1) Login to machine/server where corresponding IS instance is installed and then go to [Software AG installation directory] \ [specific IS instance folder] (e.g. default or whatever instance name) \ [packages\WmPublic\config] directory
2) Now open/edit fileAccessControl.cnf file and then include/add required path (directory path in which you want to write file) in front of “allowedWritePaths” field and save file changes. Note: If you want to include multiple paths then use “;” as separator. Make sure to replace “\” with “/” while adding file path in .cnf file.
3) Reload WmPublic package in IS designer (after saving changes to cnf file) and try to execute stringToFile service again and it should work fine.