Problem: Newly created branches in Azure DevOps are not reflecting in Git Repositories section of webMethods service designer (eclipse)
Scenario Details:
You have few new branches created in Azure DevOps but those newly created branches are not appearing under ‘Remote Tracking’ of corresponding repo in your eclipse Git Repositories section despite multiple Pull attempts.
Solution:
Go to Git Repositories section of software AG designer and right click desired repository in it, and click on “Remote > Fetch…” option as shown below:
On next screen, click on “Add All Branches Spec” button as shown below, and then remove any existing/previous entry under the section ‘Specifications for fetch’, and finally click on ‘Finish’ button
Now wait for fetch operation to complete and then you will be able to see newly created remote branches in your Git Repositories under ‘Remote Tracking‘ of corresponding branch (in your eclipse IDE)
Problem: How to install TFS plugin for Eclipse IDE
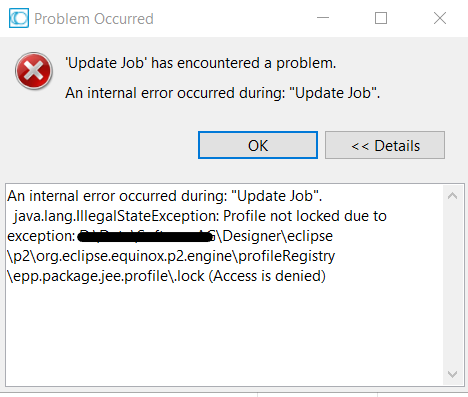
Scenario Details: You are trying to install TFS plugin for Eclipse IDE but the url (http://dl.microsoft.com/eclipse/tfs) is giving error as shown below:
Upon successful download, open Eclipse IDE and go to Help -> Install New Software.. as shown in below screenshot:
On next screen, click on “Add” button to add new repository and then click “Archive” button in order to browse to the downloaded plugin setup (zip file) as shown in below series of screenshots:
On next screen, select all checkboxes as shown in below screenshot:
Click on Next button to complete plugin installation.
Restart IDE after successful completion of plugin installation and go to Windows -> Show View -> Others..and you should be able to see Team Foundation Server folder as shown below:
You should now be able to connect TFS and check-in/check-out code/files using “Team Foundation Server Exploring” perspective of Eclipse IDE
How to load flow service input values from JSON string?
Scenario Details:
Suppose you have one or more flow services exposed as an API (REST resource) in API gateway. Now at some point in time, you may want to manually run/debug one of those flow services, but you don’t want to manually enter values for that flow service input parameters (assuming service has some complex/huge input structure) during manual run/debug. You instead want to take advantage of already available JSON request payload of the corresponding API and utilize the JSON request payload to populate input parameters of the flow service in question
Solution:
Suppose JSON request payload is as following:
Suppose the flow service that you want to manually run/debug has following input structure:
You can follow steps mentioned below, in order to extract values from JSON request payload (shown in above screenshot) and then map them to the input parameters of corresponding flow service (shown in above screenshot):
1) Create a new flow service
2) Inside, newly created flow service, add INVOKE step to invoke built-in service jsonStringToDocument in order to convert input JSON string to a “document”.
3) Next, add INVOKE step to execute desired flow service and then extract desired value(s) or document(s) from the document produced in above step and then map those value(s) or document(s) with the input of desired flow service
4) Now you can manually invoke/debug the newly created flow service and it will accordingly run/debug the inner (or invoked) flow service
Getting error message “Could not login. Unknown Error” when I try to login webMethods IS admin UI using Administrator login & password as shown in below screen shot:
Solution:
One possible reason for this error could be the UM server not started properly and in that case you may fix this issue as following:
Manually start UM server
After the UM started successfully, go to SAG installation directory and manually stop default (or required) instance of Integration server using batch file (shutdown.bat) in bin folder
Now, start Integration server instance using batch (startup.bat) in bin folder and wait for startup process to complete successfully
Now login to IS admin UI using valid credentials and you should be able to login successfully this time
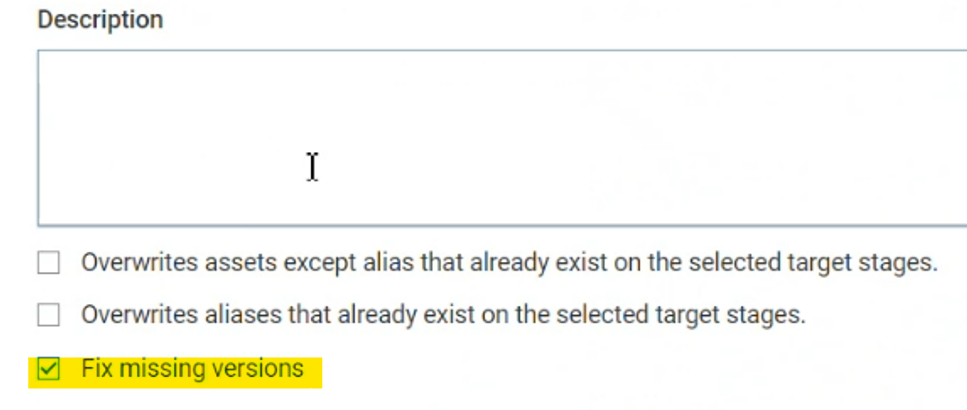
Problem: During promotion of specific version of API from one environment to another, webMethods API Gateway generates following error:
The API with name <SomeAPIName>and system version <SomeVersionNumber> cannot be added to the version chain, because there are missing version numbers. Try to use the option Fixing missing versions.
Sample error message would be something like “The API with name MyAPIName and system version 5 cannot be added to the version chain, because there are missing version numbers. Try to use the option Fixing missing versions.“
Scenario Details: Suppose you have multiple versions of an API (i.e. version 1 to version 5) in source environment and you have only version 1 of same API in destination environment and now you want to promote a specific version (lets say version 5) of that particular API to destination environment using promotion option in webMethods API gateway. Upon trying to promote version 5 (to destination environment), you may see above mentioned error in API gateway promotion report telling you that version 5 cannot be added to the version chain of API in question.
Solution: In this case, during promotion, select the check box “Fix missing version” as shown below:
When this “Fix missing versions” check box is selected, then any discrepancy in API versions in source & target environment is fixed/solved during Promotion.
For example suppose you have three version of API ‘MyAPI’ in source environment and the destination environment has only version 1 of ‘MyAPI’ and now you want to promote only version 3 of the same API to destination environment then if you select check box “Fix missing version” during promotion then existing version 1 of ‘MyAPI’ in ‘destination’ will be linked to newly promoted version ‘3’ of same API in destination. However, if you don’t select check box “Fix missing version” during promotion, then in this particular scenario you may get error during promotion similar to the one mentioned above in this post.
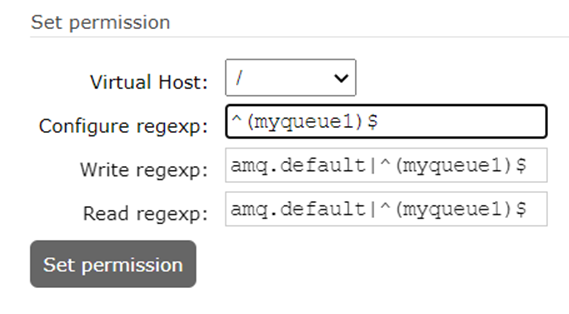
User level permissions in RabbitMQ are configured using regex. Permissions related regex can be defined via command line or via RabbitMQ UI
Following are the steps to define/configure user permissions using RabbitMQ UI:
1) Login to RabbitMQ UI (default port is 15672) using web browser
2) Go to “Admin” tab” and create new user (or click on an existing user)
3) Now, Under the ‘Set permissions’ section, you can specify appropriate regex to define user permissions as shown in below screenshot:
Note: regex used in above screenshot instructs that user have “configure” access to queue named as ‘myqueue1’ only, and has read/write access to default exchange (amq.default) as well as queue named as ‘myqueue1‘
You can use any valid regex to specify user permissions as per requirement. Few sample regex are as following:
• “amq.default|^(myqueue1)$” (this regex will grant permission to default exchange (amq.default) and queue named as (myqueue1)
• “amq.default|^(myqueue1)$|^(myqueue2)$ |^(myqueue3)$” (this regex will grant permission to default exchange (amq.default) and queue named as (myqueue1 or myqueue2 or myqueue3)
• “amq.default|^(MySamplePrefix-).*$” (this regex will grant permission to default exchange (amq.default) and any queue whose name start with (MySamplePrefix-)
Getting following error message when trying to publish message to desired queue in RabbitMQ:
operation basic.publish caused a channel exception access_refused: access to exchange ‘amq.default’ in vhost ‘/’ refused for user ‘myuser’
Solution:
Make sure that RabbiqMQ user/login being used to push to queue has Read/Write access to ‘amq.default’. This error message is generated by RabbitMQ when user/login doesn’t have permissions to read/write default exchange (amq.default)
Permissions in RabbitMQ are defined using regex. For example regex ‘amq.default|^(my-queue1 | my-queue2)$‘ can be specified as Write regex and Read regex (under user permissions) in RabbitMQ. This regex, when used as Write regex under user/login permissions, will establish that user/login in question has WRITE access to default exchange (amq.default) as well as ‘my-queue1’ and ‘my-queue2’ (where my-queue1 & my-queue2 are two different queues). Similarly when used as Read regex under user/login permissions, will establish that user/login in question has READ access to default exchange (amq.default) as well as ‘my-queue1’ and ‘my-queue2’
Note: ‘amq.default’ refers to the default exchange in RabbitMQ. Exchange in RabbitMQ is like a message broker and used to route incoming message to appropriate queue depending upon exchange type being used. There are different types of exchanges in RabbitMQ where each exchange has its own way of routing messages to queue depending upon certain parameters & bindings
CORS (cross origin resource sharing) is a standard that defines how cross-domain request & data transfers can take place between browser & web servers. CORS standards use set of custom headers that allow any web server to describe different origins/domains that are permitted to read resources hosted on that server
CORS become significant when browsers are used to access resource on web servers (e.g. when browser is used a user-agent to access an API on web server)
In api gateway, CORS is available as a sub-policy under “Response processing” policy. If you want to apply this policy in API Gateway then make sure you that extended propertywatt.server.cors.enabled doesn’t exists in integration server or is set to false.
CORS preflight request is an HTTP request that is sent by browser (before actual CORS request) to check if web server will allow actual CORS request or not. CORS pre-flight request uses OPTIONS method.
Steps to enable CORS in webMethod API Gateway:
Login to api gateway and edit the API in which you want to enable CORS
Now go to Policies section of that API and add CORS policy under ‘Response Processing’ as shown in below screenshot:
You can now configure CORS policy as per requirement as shown in below screenshot:
Where:
Allowed Origins = list of domains/origins allowed to invoke this API using browser (i.e. origins allowed in HTTP request) Allow Header = list of headers allowed in request for pre-flight requests or actual requests Expose Headers = list of headers that will be exposed to user upon request failure Allow Methods = HTTP methods allowed in web request
Note:
To better understand what headers to add under “Allow Header” configuration of CORS policy, it is recommended to analyze incoming request (e.g. preflight request) or check with consumer/user to find out what headers will be part of CORS pre-flight request or actual CORS reqeust
It is important to understand that web server will return 200 OK response against CORS pre-flight request when the origin in request matches with origin specified in API level CORS policy and header in request matches with allow header configured in API level CORS policy and HTTP method in request matches with allow methods configured in API level CORS policy
Finally save changes in API to allow CORS come into effect.
How to access localhost based database inside the docker container
Scenario Details:
We are running a docker container in windows based DEV environment and inside that container we want to access a database (SQL server DB) which is running on localhost.
Both docker container and the database (SQL Server in our case) are running on same machine/host. Now inside the container, when we try to access localhost database using “localhost” servername or IP “127.0.01” then we get connection error
Solution:
We were able to fix this issue by replacing “localhost” with “host.docker.internal” inside docker container to point to host.
In other words if you want to point to host (on which docker container is running) from inside the docker container then you can use “host.docker.internal” as a replacement of localhost (or alternatively you can specify IP address of the network interface of the host machine but in that case please keep in mind that if IP address of the host gets changed later due to any reason then DB connection inside the container will break)
Inside the docker container:
localhost/127.0.0.1 will resolve/point to current docker container